Swapsy
A local classifieds marketplace where people buy, sell and swap: one Flutter app (iOS and Android) and one Next.js server that is the website, the admin panel and the API. You add your own keys; everything else is ready.
1. Welcome
Thank you for buying Swapsy. This guide is written for beginners: follow the chapters in order and you will have the server, the website, the admin panel and the app running under your own name and keys.
What is in the download
| Folder | What it is |
|---|---|
swapsy_mobile_flutter/ | The app. People browse ads near them (list and map), search with filters, chat with sellers, make offers or offer a swap, pick a safe meetup spot, save favourites and searches with alerts, and post their own ads with boosts. |
swapsy_web_nextjs/ | One Next.js app that is the website, the admin panel (/admin), the API the app uses (/api/v1) and the background worker (pnpm worker). |
deploy/ | The Docker stack: website/API + worker + PostgreSQL database + MinIO file storage, started with one command. |
tools/rename.mjs | Renames the app, its package id, brand colour, website font and icon in one command. |
docs/ | This documentation (HTML and PDF). |
How the parts fit
The app and the website talk to the same server. All data (ads, categories, chats, offers, meetups, reviews, payments) lives in your PostgreSQL database. Photos and ID-check images live in S3-compatible storage (MinIO in the Docker stack, or Amazon S3 / Cloudflare R2). Firebase is used only for sign-in and push notifications.
The life of an ad: a member posts it in the 7-step form → it waits in Admin → Moderation (trusted, ID-verified sellers can skip review) → once approved it shows in search, on the map, in saved-search alerts and to the seller's followers → buyers chat, make an offer or offer a swap, and agree a safe meetup spot → the seller marks it sold, both sides rate each other, or the ad expires after the days set in the admin.
2. Requirements
To run the server
- A Linux server (VPS) with at least 2 CPU cores, 4 GB RAM and 30 GB disk. Ubuntu 24.04 is used in this guide.
- Docker with the Compose plugin (install guide).
- A domain name, for example
your-domain.com, with a DNS A record pointing at the server.
To build the mobile app
- Flutter 3.44 or newer (install), Android Studio for Android, a Mac with Xcode 26 for iOS (iOS 15 or newer on the phone).
- Node.js 22 or newer for the rename tool, and pnpm 11 (
npm i -g pnpm) if you run the website without Docker.
Accounts you will create (all have free tiers)
- Firebase (required: sign-in and push).
- Optional, when you want them: Stripe, PayPal, Razorpay or Flutterwave (card payments), RevenueCat (in-app purchases on iPhone), Google Cloud (address search with the Geocoding API), a map tile provider such as MapTiler, and any SMTP email provider.
3. Quick start (Docker)
This gets the whole server running on your VPS in about 15 minutes. You need the Firebase keys from chapter 4 for sign-in; you can start this chapter first and add them before the install wizard.
- Copy the kit to the server, for example with
scp swapsy-1.0.0.zip root@YOUR_SERVER_IP:, then on the server:apt install -y unzip unzip swapsy-1.0.0.zip cd swapsy/deploy cp .env.example .env nano .env - In
.env, fill at least these values:Key What to put POSTGRES_PASSWORDA long random password, letters and digits only (run openssl rand -hex 24to make one).S3_SECRET_ACCESS_KEYAnother random value for the built-in MinIO storage (at least 8 characters). APP_URLYour website address, e.g. https://your-domain.com(orhttp://YOUR_SERVER_IP:3000for a first test).NEXT_PUBLIC_FIREBASE_*,FIREBASE_*From chapter 4. - Start everything:
The first build takes 5–10 minutes. On every start the database tables are created or updated, and the base data (categories, cities, safe spots, packages) is loaded once.docker compose up -d --build - Open
APP_URL/installin your browser. The install wizard creates your admin account, names the marketplace, sets the currency and units, and can load the sample ads (chapter 7). - Check it:
APP_URL/api/v1/healthshows{"ok":true,…}. Then put it on your domain with HTTPS (chapter 5).
.env? Run docker compose up -d again. The Firebase web values are read when the page loads, so no rebuild is needed for them.4. Firebase setup
Firebase handles sign-in (Google, Apple, phone, email and guest) and push notifications. Your data stays in your own database.
- Go to the Firebase console → Add project. Give it your app name.
- Build → Authentication → Get started → Sign-in method. Turn on: Anonymous (guest mode), Google, Phone, Email/Password (members and admin staff) and Apple (see chapter 15).
- Phone sign-in only: Authentication → Settings → SMS region policy — allow the countries your users are in. Without it Firebase refuses to send the code.
- Authentication → Settings → Authorized domains: add
your-domain.com. - Project settings (gear) → General → Your apps → Add app → Web (name it "Website"). Copy the values from the
firebaseConfigshown intodeploy/.env:NEXT_PUBLIC_FIREBASE_API_KEY="…apiKey…" NEXT_PUBLIC_FIREBASE_AUTH_DOMAIN="your-project.firebaseapp.com" NEXT_PUBLIC_FIREBASE_PROJECT_ID="your-project" NEXT_PUBLIC_FIREBASE_STORAGE_BUCKET="your-project.firebasestorage.app" NEXT_PUBLIC_FIREBASE_MESSAGING_SENDER_ID="…" NEXT_PUBLIC_FIREBASE_APP_ID="1:…:web:…" - Project settings → Service accounts → Generate new private key. A JSON file downloads. Copy three values from it into
deploy/.env:
Keep theFIREBASE_PROJECT_ID="your-project" FIREBASE_CLIENT_EMAIL="firebase-adminsdk-xxxx@your-project.iam.gserviceaccount.com" FIREBASE_PRIVATE_KEY="-----BEGIN PRIVATE KEY-----\nMIIE…\n-----END PRIVATE KEY-----\n"\nas they are in the file. Keep this file secret. - Register the mobile app: Project settings → Your apps → Add app → Android and iOS, with your package id (e.g.
com.yourcompany.swapsy). Rename the app first if you want your own id (chapter 16). Or use the FlutterFire CLI, which registers both for you:dart pub global activate flutterfire_cli cd swapsy_mobile_flutter flutterfire configure --project your-project --platforms android,ios \ --android-package-name com.yourcompany.swapsy --ios-bundle-id com.yourcompany.swapsy - Copy the app's values into
swapsy_mobile_flutter/.env:FIREBASE_PROJECT_ID,FIREBASE_MESSAGING_SENDER_ID,FIREBASE_STORAGE_BUCKET,FIREBASE_ANDROID_API_KEY,FIREBASE_ANDROID_APP_ID,FIREBASE_IOS_API_KEY,FIREBASE_IOS_APP_ID,FIREBASE_IOS_CLIENT_ID,FIREBASE_IOS_BUNDLE_ID. You find them in the app'sgoogle-services.json/GoogleService-Info.plist(download them from Project settings), or on the app's card. The app reads these values from.env, so you do not need to put the downloaded files in the project. - Google sign-in on Android needs
GOOGLE_SERVER_CLIENT_IDin the app's.env: Authentication → Sign-in method → Google → Web SDK configuration → Web client ID. - Google sign-in on iOS: open
swapsy_mobile_flutter/ios/Flutter/GoogleSignIn.xcconfigand setGOOGLE_IOS_CLIENT_ID(theCLIENT_IDinGoogleService-Info.plist) andGOOGLE_REVERSED_CLIENT_ID(itsREVERSED_CLIENT_ID). - Android Google and phone sign-in need your signing key fingerprints: run
cd android && ./gradlew signingReportin the app and add the SHA-1 and SHA-256 under Project settings → Your apps → Android → Add fingerprint. Add the fingerprints of your upload key and of Google Play's app signing key too when you publish.
5. Put it online (VPS, HTTPS)
The quickest way: the stack has a built-in Caddy web server that gets a free HTTPS certificate for your domain.
- Point your domain's DNS A record at the server and wait until it resolves.
- In
deploy/.envsetDOMAIN=your-domain.comandAPP_URL=https://your-domain.com. - Open ports 80 and 443 in the firewall (
ufw allow 80,443/tcp) and start the stack with the https profile:docker compose --profile https up -d - Add
your-domain.comto Firebase → Authentication → Settings → Authorized domains, if you have not yet.
Already run nginx, Traefik or another proxy? Skip the profile and forward your domain to 127.0.0.1:3000 (the WEB_PORT).
Backups
Back up the database every day, for example with a cron job:
docker compose exec -T postgres pg_dump -U swapsy swapsy | gzip > /root/backups/swapsy-$(date +%F).sql.gzAlso back up the minio-data volume (photos and ID-check images), or use a cloud bucket (next chapter).
6. Other hosting
Website on Vercel, database on a managed PostgreSQL
- Create a PostgreSQL database (Neon, Supabase, Railway…) and copy its connection string.
- Import
swapsy_web_nextjs/into Vercel. Add every key fromswapsy_web_nextjs/.env.exampleas an environment variable, withDATABASE_URLset to your database and the fiveS3_*keys set to a cloud bucket (Vercel has no disk for uploads). - On your computer, create the tables once:
cd swapsy_web_nextjs && pnpm install && pnpm prisma:migrate:deploy && pnpm prisma:seed -- --base(withDATABASE_URLin.env). Then open/installon your Vercel domain. - The background worker does not run on Vercel. Run
pnpm workeron any small server or service that keeps a process running (Railway, Render, a VPS) with the same environment variables. Without the worker, offers do not expire, reservations are not released, boosts do not start or end, and alerts, meetup reminders and scheduled notifications are not sent.
Cloud storage instead of MinIO
Create a private bucket on Amazon S3 or Cloudflare R2 and set S3_ENDPOINT (empty for AWS, your R2 endpoint for R2), S3_REGION, S3_BUCKET, S3_ACCESS_KEY_ID and S3_SECRET_ACCESS_KEY. Files are served through the API, so the bucket stays private; ID-check images are only shown to admin staff.
Without Docker
Install Node.js 22 and pnpm 11, then in swapsy_web_nextjs/: cp .env.example .env, fill it in, and run pnpm install, pnpm prisma:migrate:deploy, pnpm prisma:seed -- --base, pnpm build, then keep pnpm start and pnpm worker running (for example with pm2). Without S3_* keys, uploads are stored in the uploads/ folder. Open /install to finish.
7. Install wizard and sample data
The first time, open /install on your website. It asks for:
- Your admin account (name, email and password). This is the super admin; you add more staff later in Admin → Roles & staff.
- The marketplace: name, currency, distance unit (miles or kilometres) and time zone.
- The look and content: the brand colour, and Load the sample ads for sample members, ads, chats, offers and reviews around Austin, Texas, so every screen has content. Without it you start with only the base data: categories with their custom fields, cities and areas, safe meetup spots, packages, report reasons, FAQ and safety tips.
The wizard closes for good once a super admin exists. Sign in later at /admin.
8. Setup check
Two ways to see which keys are missing and whether each service answers:
- Admin → Setup check: every key from every
.env.example(server, app, Docker) marked set or missing, and a live test of the database, Firebase, push, payments, storage, email, address search and the worker. Values are never shown. - Command line: in
swapsy_web_nextjs/runpnpm run doctor(with Docker:docker compose exec worker pnpm run doctor).
9. Run the mobile app
- Fill in the settings file (the download ships a copy of
.env.exampleas.envso the app builds):
Setcd swapsy_mobile_flutter nano .envAPI_BASE_URLto your server (https://your-domain.com; forpnpm devon your computer usehttp://10.0.2.2:3351in the Android emulator) and the Firebase values from chapter 4. - Get the packages and run:
flutter pub get
flutter run
Build for release
flutter build appbundle      # Android, for Google Play
flutter build ipa            # iOS, for the App Store (on a Mac)
10. Run your marketplace
| Task | Where |
|---|---|
| Review new ads | Admin → Moderation: open an ad, check the photos, text and the automatic risk flags (pay-outside-the-app wording, phone numbers or links, a price far below similar ads, duplicates, new sellers, reports), then approve or reject with a reason the seller sees. Admin → Settings → Marketplace rules sets the review mode (everything, or trusted sellers go live at once). |
| Categories and custom fields | Admin → Categories (icons, colours, subcategories, whether swaps are allowed, manual review) and Custom fields (the extra details each category asks for, such as brand, storage or mileage; filterable fields appear in search filters). |
| Cities, areas and safe spots | Admin → Cities & areas and Meetup spots: add police Safe Exchange Zones, staffed stores, libraries and banks. Chats suggest the spot halfway between the two people. |
| Verify members | Admin → Verification: compare the ID photos with the selfie, then approve or reject with a reason. Approved members get the ID-verified badge. ID images are deleted 30 days after the decision. |
| Reports | Admin → Reports lists ads, members and chats people reported. Take action (for example remove the ad or suspend the member) or dismiss the report. Admin → Reports → Reasons edits the reasons people can pick. |
| Members | Admin → Users: search, filter, export CSV, open a member to see their ads, reports and payments, and suspend or ban. |
| Banners, blog, FAQ, safety tips, push | Admin → Banners, Blog, FAQ, Safety tips and Notifications. |
| Staff and permissions | Admin → Roles & staff: add staff and choose what each role may view, create, edit and delete. The Audit log shows who changed what. |
11. Boosts, packages and payments
Members can keep a number of ads live for free (Admin → Settings → Marketplace rules). Boosts (Bump, Featured, Top of category, and a 5-boost bundle) put one ad higher in search and on Home for a few days and can be scheduled to start later. Listing packages (Starter pack, Pro Seller) raise how many ads can be live. Edit them in Admin → Packages; the server enforces every limit.
Card payments on the website (and in the Android app)
Turn on any of these; buyers pay on the provider's own secure page and come back to /pay/return. Set the keys in deploy/.env, then switch each gateway on in Admin → Settings → Payment gateways.
| Gateway | Keys | Webhook URL (in the provider's dashboard) |
|---|---|---|
| Stripe (cards, Apple Pay, Google Pay) | STRIPE_SECRET_KEY, STRIPE_WEBHOOK_SECRET | https://your-domain.com/api/v1/webhooks/stripe with the events checkout.session.completed, checkout.session.async_payment_succeeded, checkout.session.async_payment_failed, checkout.session.expired |
| PayPal | PAYPAL_CLIENT_ID, PAYPAL_CLIENT_SECRET, PAYPAL_MODE=live | None needed: the payment is confirmed when the buyer returns. |
| Razorpay (India) | RAZORPAY_KEY_ID, RAZORPAY_KEY_SECRET, RAZORPAY_WEBHOOK_SECRET | https://your-domain.com/api/v1/webhooks/razorpay, event payment_link.paid |
| Flutterwave (Africa) | FLUTTERWAVE_SECRET_KEY, FLUTTERWAVE_WEBHOOK_HASH | https://your-domain.com/api/v1/webhooks/flutterwave (set the same secret hash there) |
In the iPhone app: RevenueCat
Apple requires in-app purchases for digital goods in iOS apps. On iPhone, boosts and packages are bought through the App Store with RevenueCat; on Android the app opens the same secure web checkout.
- Create one consumable product per boost and package in App Store Connect (and in the Play Console if you prefer store billing on Android too).
- Create a project in RevenueCat, add the apps and import the products.
- Put each product id on its package in Admin → Packages (iOS product id, Android product id).
- App keys:
REVENUECAT_IOS_KEYandREVENUECAT_ANDROID_KEYinswapsy_mobile_flutter/.env(RevenueCat → API keys → public app keys). - Server keys in
deploy/.env:REVENUECAT_API_KEY(secret key, used to confirm each purchase) andREVENUECAT_WEBHOOK_SECRET, entered in RevenueCat → Integrations → Webhooks as the Authorization headerBearer YOUR_SECRETwith the URLhttps://your-domain.com/api/v1/webhooks/revenuecat. Then turn on in-app purchases in Admin → Settings → Payment gateways.
Demo purchases
While no gateway is set, purchases are granted at once with a DEMO label. Set DEMO_PAYMENTS=false to switch that off before your keys are in. Sales tax and its label are in Admin → Settings → Payment gateways.
12. Push notifications
New messages, offers and counter-offers, meetup updates, ad decisions, price drops, saved-search alerts, new ads from followed sellers and admin campaigns are sent with Firebase Cloud Messaging through your FIREBASE_* service account — nothing else to set for Android. For iOS, upload an APNs key: Apple Developer → Keys → + (Apple Push Notifications service), then Firebase → Project settings → Cloud Messaging → Apple app configuration → Upload. In Xcode, the app already has the Push Notifications capability.
Every member also has a notification inbox (app and website) and switches for each kind of notification in their settings.
13. Maps, cities and safe spots
- Map tiles: OpenStreetMap's public tiles by default — fine to start, but their usage policy asks heavy users to use a provider. Set
MAP_TILE_URL(e.g. MapTiler:https://api.maptiler.com/maps/streets-v2/{z}/{x}/{y}.png?key=YOUR_KEY) andMAP_ATTRIBUTION. The app and the website read them from the server. - Address search: with
GOOGLE_MAPS_API_KEY(Geocoding API enabled) the server uses Google; without it, OpenStreetMap's Nominatim (rate-limited, results cached). - Privacy: ads only show an approximate area, never the seller's address. The default map position and search radius are in Admin → Settings → Maps & API keys and Marketplace rules.
14. Email
Set SMTP_HOST, SMTP_PORT, SMTP_USER and SMTP_PASS (any provider: Amazon SES, Brevo, Mailgun, Postmark, your host's mail server). Use port 587, or 465 with SMTP_SECURE=true. The sender name and address are in Admin → Settings → Email, and every email's text is in Admin → Email templates. Until SMTP is set, emails are printed to the server log (docker compose logs web).
15. Sign-in methods
| Who | Methods |
|---|---|
| App | Google, Apple (iOS), phone number (SMS code), email and password, and guest (browse, search and favourite; sign in to post, chat or make offers). |
| Website | Google, Apple, phone number, and email and password with "Forgot password". |
| Admin | Email and password, with "Forgot password". |
Each method must be on in Firebase (chapter 4). Guest mode can be switched off in Admin → Settings → General.
Apple sign-in (required by Apple when an iOS app offers Google sign-in): in the Apple Developer account, enable Sign in with Apple for your app id and add the capability in Xcode. For the website, create a Services ID and a key, and enter them in Firebase → Authentication → Sign-in method → Apple, with the return URL Firebase shows there.
16. Rename the app and package id
From the kit folder (the one holding swapsy_mobile_flutter; requires Node.js):
node tools/rename.mjs --name "TradeHub" --id com.yourcompany.tradehub--namereplaces the name everywhere it is shown: under the app icon, page titles, emails and push.--idsets the Android package and the iOS bundle id, moves Android'sMainActivity, and updatesFIREBASE_IOS_BUNDLE_IDin the app's.env.--dryshows what would change first.
Then register the new id in Firebase (chapter 4). The name people see on the website also comes from Admin → Settings → General → App name, so you can change it any time without a new build.
17. Logo, icon, colours and fonts
The rename tool does these too:
node tools/rename.mjs --color "#7C3AED" --font "Manrope" --icon my-icon.png- Colour: sets the brand colour with matching light and dark tints in the app (
lib/core/theme/tokens.dart) and on the website (src/app/globals.css), the logo, and the icon and splash backgrounds. Admin → Settings → General → Primary colour overrides it at run time without a new build. - Icon: a square PNG of at least 1024×1024; it becomes the app icon and the website icons. Replace
assets/brand/icon_foreground.png(the icon art on a transparent background, used by Android's adaptive icon and the splash) andsplash_android12.pngby hand. Then run, inswapsy_mobile_flutter:dart run flutter_launcher_iconsanddart run flutter_native_splash:create. - Website font: any Google Font name.
- Logo on the website and in emails: Admin → Settings → General → Logo URL.
- App font: the app uses Poppins from
assets/fonts/(declared inpubspec.yaml). Put your font files there, change thefonts:entry, and change the font family inlib/core/theme/.
18. Basic edits
| I want to change… | Where |
|---|---|
| Terms, privacy policy and About | Admin → Settings → General → Legal pages (shown in the app and on the website). |
| Currency, distance unit | Admin → Settings → Currency & units. |
| Free live ads, ad lifetime, renewals, photos per ad, offer expiry, counters, reservation time, swaps on/off | Admin → Settings → Marketplace rules. |
| Home banners | Admin → Banners (app home slider and website, with a schedule). |
| Help centre questions, safety tips | Admin → FAQ and Safety tips. |
| Support email and phone | Admin → Settings → General. |
| Force an app update, maintenance message | Admin → Settings → General (minimum and latest app version) and Maintenance. |
| App download links on the website | Admin → Settings → General (App Store, Google Play and APK links). |
| Texts inside the app | The screens are in swapsy_mobile_flutter/lib/pages/; search for the text and edit it. |
| Texts on the website | The pages are in swapsy_web_nextjs/src/app/(site)/. |
19. Every key, explained
Each folder has a .env.example that lists its keys with comments. This table lists all of them: website = swapsy_web_nextjs/.env, Docker = deploy/.env, app = swapsy_mobile_flutter/.env.
| Key | Required | Where | What it does |
|---|---|---|---|
| Database | |||
DATABASE_URL | Yes | website | PostgreSQL connection string |
POSTGRES_DB | Yes | Docker | Database the Docker stack creates |
POSTGRES_USER | Yes | Docker | Database user for the Docker stack |
POSTGRES_PASSWORD | Yes | Docker | Database password for the Docker stack |
| App | |||
APP_URL | Yes | website, Docker | Public URL of the website/API, e.g. https://swapsy.example.com |
NEXT_PUBLIC_APP_NAME | — | website, Docker | Name shown before the admin sets one |
WEB_PORT | — | Docker | Host port the web container listens on |
DOMAIN | — | Docker | Your domain for automatic HTTPS (docker compose --profile https) |
CORS_ORIGINS | — | website, Docker | Browser apps allowed to call /api/v1 (Flutter web builds) |
DEMO_MODE | — | website, Docker | "true" only for a public demo: one-click demo sign-in |
| Firebase sign-in | |||
NEXT_PUBLIC_FIREBASE_API_KEY | Yes | website, Docker | Firebase web app config |
NEXT_PUBLIC_FIREBASE_AUTH_DOMAIN | Yes | website, Docker | Firebase web app config |
NEXT_PUBLIC_FIREBASE_PROJECT_ID | Yes | website, Docker | Firebase web app config |
NEXT_PUBLIC_FIREBASE_STORAGE_BUCKET | — | website, Docker | Firebase web app config |
NEXT_PUBLIC_FIREBASE_MESSAGING_SENDER_ID | — | website, Docker | Firebase web app config |
NEXT_PUBLIC_FIREBASE_APP_ID | Yes | website, Docker | Firebase web app config |
| Firebase Admin + push | |||
FIREBASE_PROJECT_ID | Yes | website, Docker | Firebase project id |
FIREBASE_CLIENT_EMAIL | Yes | website, Docker | Service account e-mail |
FIREBASE_PRIVATE_KEY | Yes | website, Docker | Service account private key |
| Payments | |||
STRIPE_SECRET_KEY | — | website, Docker | Stripe secret key — cards, Apple Pay, Google Pay on web and Android |
STRIPE_WEBHOOK_SECRET | — | website, Docker | Stripe webhook signing secret (/api/v1/webhooks/stripe) |
PAYPAL_CLIENT_ID | — | website, Docker | PayPal REST app client id |
PAYPAL_CLIENT_SECRET | — | website, Docker | PayPal REST app secret |
PAYPAL_MODE | — | website, Docker | "live" for real payments; empty = sandbox |
RAZORPAY_KEY_ID | — | website, Docker | Razorpay key id (India) |
RAZORPAY_KEY_SECRET | — | website, Docker | Razorpay key secret |
RAZORPAY_WEBHOOK_SECRET | — | website, Docker | Razorpay webhook secret (/api/v1/webhooks/razorpay) |
FLUTTERWAVE_SECRET_KEY | — | website, Docker | Flutterwave secret key (Africa) |
FLUTTERWAVE_WEBHOOK_HASH | — | website, Docker | Flutterwave webhook secret hash |
REVENUECAT_API_KEY | — | website, Docker | RevenueCat secret API key — confirms in-app purchases |
REVENUECAT_WEBHOOK_SECRET | — | website, Docker | RevenueCat webhook Authorization value |
DEMO_PAYMENTS | — | website, Docker | "false" turns off the free DEMO purchases while no gateway is set |
| Maps | |||
GOOGLE_MAPS_API_KEY | — | website, Docker | Google Geocoding for address search (empty = OpenStreetMap) |
MAP_TILE_URL | — | website, Docker | Map tiles URL template (MapTiler, Stadia, Mapbox…) |
MAP_ATTRIBUTION | — | website, Docker | Credit line your tile provider requires |
| Storage | |||
S3_ENDPOINT | — | website, Docker | S3-compatible endpoint (MinIO, R2); empty for AWS |
S3_REGION | — | website, Docker | Bucket region |
S3_BUCKET | — | website, Docker | Bucket for photos and documents (empty = local uploads folder) |
S3_ACCESS_KEY_ID | — | website, Docker | Storage access key |
S3_SECRET_ACCESS_KEY | — | website, Docker | Storage secret key |
SMTP_HOST | — | website, Docker | SMTP server; empty = emails are printed to the log |
SMTP_PORT | — | website, Docker | 587 (STARTTLS) or 465 (TLS) |
SMTP_USER | — | website, Docker | SMTP user |
SMTP_PASS | — | website, Docker | SMTP password |
SMTP_SECURE | — | website, Docker | "true" for port 465 (TLS); empty for 587 |
| Storage | |||
UPLOAD_DIR | — | website | Folder for uploads when no bucket is set (default ./uploads) |
| Firebase Admin + push | |||
FCM_TOPIC_PREFIX | — | website, Docker | Prefix of the push topics (default swapsy) |
EMAIL_DISABLED | — | website, Docker | "true" logs emails instead of sending (public demos) |
| Mobile apps | |||
API_BASE_URL | Yes | app | Your server; the app calls <url>/api/v1 |
APP_NAME | — | app | App name in the UI |
FIREBASE_PROJECT_ID | Yes | app | Firebase project id |
FIREBASE_MESSAGING_SENDER_ID | Yes | app | Firebase config |
FIREBASE_STORAGE_BUCKET | — | app | Firebase config |
FIREBASE_ANDROID_API_KEY | Yes | app | Firebase Android config |
FIREBASE_ANDROID_APP_ID | Yes | app | Firebase Android config |
FIREBASE_IOS_API_KEY | Yes | app | Firebase iOS config |
FIREBASE_IOS_APP_ID | Yes | app | Firebase iOS config |
FIREBASE_IOS_CLIENT_ID | — | app | Google sign-in on iOS |
FIREBASE_IOS_BUNDLE_ID | — | app | iOS bundle id |
GOOGLE_SERVER_CLIENT_ID | — | app | Web OAuth client id — Google sign-in on Android |
SUPPORT_EMAIL | — | app | Fallback support e-mail until the server config loads |
REVENUECAT_IOS_KEY | — | app | RevenueCat public iOS SDK key (empty = boosts paid on the web checkout or DEMO) |
REVENUECAT_ANDROID_KEY | — | app | RevenueCat public Android SDK key (empty = web checkout or DEMO) |
DEMO_SIGN_IN | — | app | "true" shows one-tap demo sign-in (your public demo only) |
20. File structure
The folders below build these screens: the app (swapsy_mobile_flutter) and the website and admin (swapsy_web_nextjs).
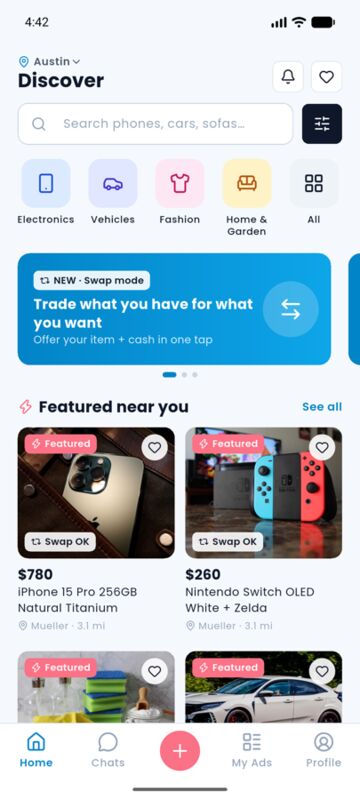
pages/home/)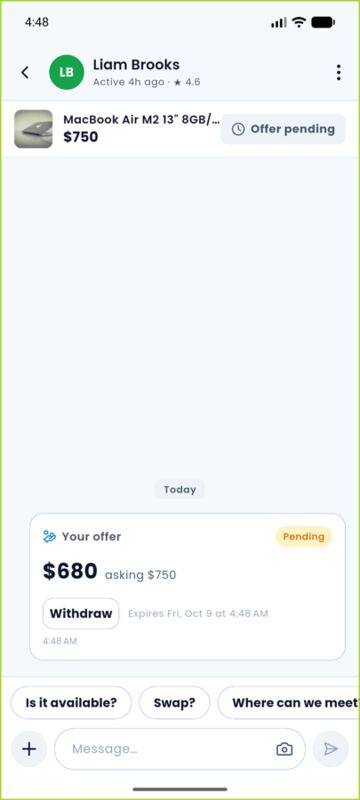
pages/chat/)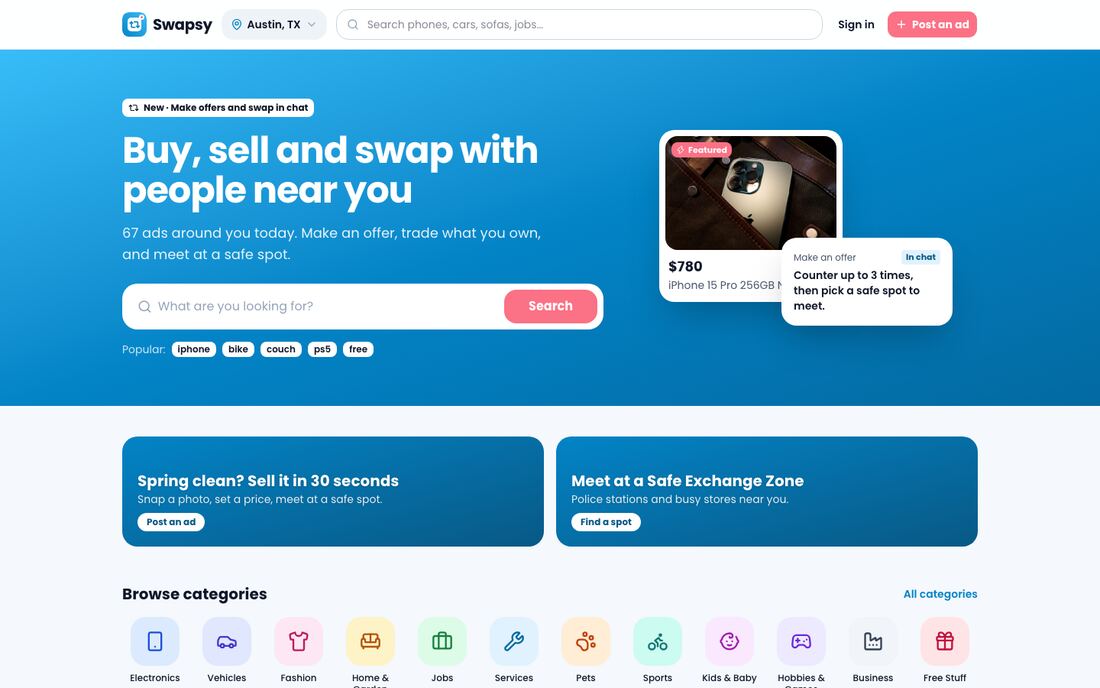
src/app/(site)/page.tsx)Mobile app (swapsy_mobile_flutter/lib)
main.dart            starts Firebase and the app
app.dart             theme, push and deep links
router.dart          every screen's route and the start-up gates (setup → onboarding → location → sign-in)
routes.dart          route names
pages/               one folder per area: launch, auth, home, search, ad, seller, chat, meetup, post
                     (the 7-step form), my_ads, boost, favourites, notifications, help, profile
widgets/             shared app widgets: ad cards, the ads map, sign-in sheet
providers/           app state with Riverpod (session, favourites, data from the API)
core/api/            API client
core/auth/           sign-in (Google, Apple, phone, email, guest)
core/config/         .env reading and Firebase options
core/models/         Ad, Category, Chat, Offer, Meetup, Config…
core/theme/          colour tokens, text styles, light and dark themes
core/widgets/        building blocks (buttons, cards, sheets, empty and error states, skeletons)
core/utils/          formatting and helpers
Long lists use lazy .builder lists; state flows through Riverpod providers.
Server (swapsy_web_nextjs/src)
app/(site)/          the public website (home, search, ad pages, sellers, post, account, chats, pricing,
                     checkout, blog, help, safety, spots, legal)
app/admin/           the admin panel
app/install/         the first-run wizard
app/api/v1/          one route that hands every API call to lib/server/router.ts
lib/server/          business logic: handlers/ (the API routes), ads, chat (offers, swaps, meetups),
                     money and payments, notify (push), email, storage, geo, settings, setup-check
lib/client/          browser code: Firebase sign-in, API calls
components/          site/ (website), panel/ (admin), app/ (shared), ui/ (building blocks)
database/            Prisma schema, migrations, seed (base and sample data)
worker/              background jobs (pnpm worker)
scripts/doctor.ts    pnpm run doctor
tests/               API tests (pnpm test)
Outside src, e2e/ holds browser smoke tests for a running server:
E2E_BASE_URL=https://your-domain.com pnpm e2e (run pnpm exec playwright install chromium once first).
21. Publish to the stores
You publish the app under your own developer accounts. Rename it first (chapter 16).
Google Play
- Create an upload key:
keytool -genkey -v -keystore ~/upload-keystore.jks -keyalg RSA -keysize 2048 -validity 10000 -alias upload. - Create
swapsy_mobile_flutter/android/key.properties:storeFile=/home/you/upload-keystore.jks storePassword=… keyAlias=upload keyPassword=…storeFileis the full path to your keystore. The build uses it automatically (without it, release builds are signed with the debug key, which Google Play refuses). Never share this file or the keystore. - Set the version in
pubspec.yaml(version: 1.0.0+1), runflutter build appbundle, and uploadbuild/app/outputs/bundle/release/app-release.aabin the Play Console. - Fill the store listing, the data safety form (the app collects name, phone, email, approximate location, photos the user uploads, ID-check images, and messages) and the content rating.
- Add the Play app signing key's SHA-1 and SHA-256 to Firebase (chapter 4).
App Store
- In Apple Developer, create the app id with Push Notifications and Sign in with Apple.
- Open
ios/Runner.xcworkspacein Xcode and choose your team under Signing & Capabilities. flutter build ipa, then upload with Xcode's Organizer or Transporter, and submit in App Store Connect. Give the reviewer a test phone number and code (chapter 4 tip), and explain that posting an ad and chatting need an account.
22. Updating
When a new version comes out, read its changelog, back up your database, and copy the new files over your copy (keep your .env files and your edits — a tool like git makes merging easy). Then docker compose up -d --build; migrations run on start. For the app, run flutter pub get and build again.
23. FAQ and troubleshooting
The app can't reach the server
Open API_BASE_URL/api/v1/health in the phone's browser. On the Android emulator, localhost is the emulator itself — use http://10.0.2.2:PORT. Android blocks plain http:// to other hosts; use HTTPS.
Sign-in fails on the website
Add your domain under Firebase → Authentication → Settings → Authorized domains, and check the NEXT_PUBLIC_FIREBASE_* values in Admin → Setup check.
Google sign-in fails on Android
Add the SHA-1 and SHA-256 of the key that signed the build (debug, upload and Play signing) to the Android app in Firebase, and set GOOGLE_SERVER_CLIENT_ID.
Phone sign-in says the SMS can't be sent
Allow your users' countries in Firebase → Authentication → Settings → SMS region policy.
A new ad does not show in search
It waits for review in Admin → Moderation (or set the review mode to trusted sellers in Admin → Settings → Marketplace rules).
Purchases say "DEMO"
No payment key is set. See chapter 11.
Photos do not upload
Run the setup check: the storage test shows the problem (wrong S3_* keys, or the bucket does not exist).
Offers never expire, boosts never start, alerts never arrive
The worker must be running: docker compose ps shows worker up, and Admin → Setup check shows its last heartbeat.
I changed .env and nothing happened
Server: docker compose up -d recreates the containers with the new values. App: stop and start the app again (a hot reload does not re-read .env).
Where are the logs?
docker compose logs -f web and docker compose logs -f worker.
24. Credits
Swapsy is built on these open-source projects, each under its own licence:
Mobile app
Flutter, flutter_riverpod, go_router, firebase_core, firebase_auth, firebase_messaging, google_sign_in, sign_in_with_apple, purchases_flutter, flutter_map, geolocator, image_picker, http, flutter_dotenv, shared_preferences, share_plus, url_launcher, package_info_plus, intl, lucide_icons_flutter, flutter_launcher_icons, flutter_native_splash.
Website, admin and API
Next.js, React, Prisma, PostgreSQL, Tailwind CSS, shadcn/ui, Base UI, Lucide, Leaflet and React Leaflet, Firebase JS SDK and Firebase Admin, Stripe Node, AWS SDK for JavaScript, Nodemailer, Zod, Sonner, MinIO, Caddy.
Fonts, maps and content
Poppins (SIL Open Font License 1.1, licence file in swapsy_mobile_flutter/assets/fonts/OFL.txt). Map data © OpenStreetMap contributors. The sample ads, people, reviews and texts are original and fictional. The sample photos are labelled placeholders; the photos on the live demo are not part of the download.
25. Changelog
1.0.0 — 2026-10-07
First release. The full list is in CHANGELOG.md.
Not in this version
App languages other than English, two-step sign-in for admins, automatic face matching for ID checks (staff compare the photos by eye), and drag-to-reorder banners.
26. Support
Use the Support tab on the item's CodeCanyon page. Please include your purchase code, what you did, what you expected and what happened, and the output of pnpm run doctor or a screenshot of Admin → Setup check.
Support covers questions about the item's features and fixing bugs in the item. Custom changes and installation on your server are not part of item support.